I am Mog Anarchy, and I like to play games. Whether they are old, new, retro, modern, online, offline, console, computer, critically acclaimed or notoriously bad. Here on my blog, I rant about, review, trash talk, praise and generally talk about all of my favourite and least-favourite games. I also write my own guides on how to accomplish tricky tasks, show off my creative endeavors and challenge myself with crazy in-game tasks. I also have a bunch of gaming merchandise which I am glad to show off. So drop me a comment, I love hearing your questions, criticisms, comments and general gaming discussions. :)

30/07/2019

Kindergarten 2 Guide - "Flowers For Diana" Storyline

This is a little guide for the Steam title Kindergarten 2, the sequel I was desperate for ever since I played the original! Like the original, it's an indie puzzle/logic/interactive story game available on Steam. Many of the puzzles and characters' storylines require strict timing and succession of events - and I recommend you try your hardest to figure out the puzzles on your own before consulting my guide below.

With that being said, if you're pulling your hair out - here's the guide. Obviously, it contains SPOILERS.

(Click on the screenshots to enlarge them!)

-------------------------------------------------------------


School Yard

(No items are needed from your bedroom before school starts.)

- Talk to Dr Danner (the science teacher with the abnormally large forehead) and tell him "I'm not below average!" - he then sets you a challenge to find 5 different coloured flowers.

- Talk to Nugget, who tells you about being trapped. Talk to the Principal (blonde lady in pink suit) and tell her about Nugget - she'll send the lunch lady Margaret to guard him.

- Talk to Cindy, then talk to Carla - neither dialogue trees use apples here but are important to trigger events later in the day.

- Talk to Monty and pay him $3.00 to use the wheelchair ramp at the right of the school.

- Pick the blue flower.


(Collectables!)
- Walk to the corner of the school wall and interact when the red exclamation mark appears. You'll find the [HARD BOOGAR] Monstermon card.

(Collectables!)
- Walk over to the trees and read the sign. Remember this order: UP, LEFT, UP, RIGHT, UP, RIGHT, LEFT, UP. Enter the woods and follow this path. At the end, you will find the [LEGENDARY SWORD] Monstermon card.


- Enter the school via the wheelchair ramp. Go up the main stairs and talk to the hall monitors to get a hall pass and the [MONITOR'S SASH] outfit.


-------------------------------------------------------------

Morning Time

- Talk to Cindy - she'll give you a love letter to deliver to Felix, who is upstairs in the "smart" class. Leave the classroom using your hall pass and go upstairs.

- Enter the science class, give Felix the love letter. Tell him that Cindy isn't bad. Get kicked out of the science lab.

- Before you go downstairs, enter the girls' bathroom and talk to Bob about wooing Ms. Applegate with some flowers.


-------------------------------------------------------------

Lunch

- Felix will come over and start talking to you about Cindy and her "vegan" diet. Go talk to Margaret (the lunch lady) and ask her for something vegan. She won't go yet, as the Janitor is still mopping the floor, but she'll go once he's done.

- Talk to Carla, who will agree to distract Stevie. With him gone, enter the teachers' lounge and grab the yellow flower.

- Talk to Margaret to get the vegan salad. Give it to Felix, then go to recess.


(Collectables!)
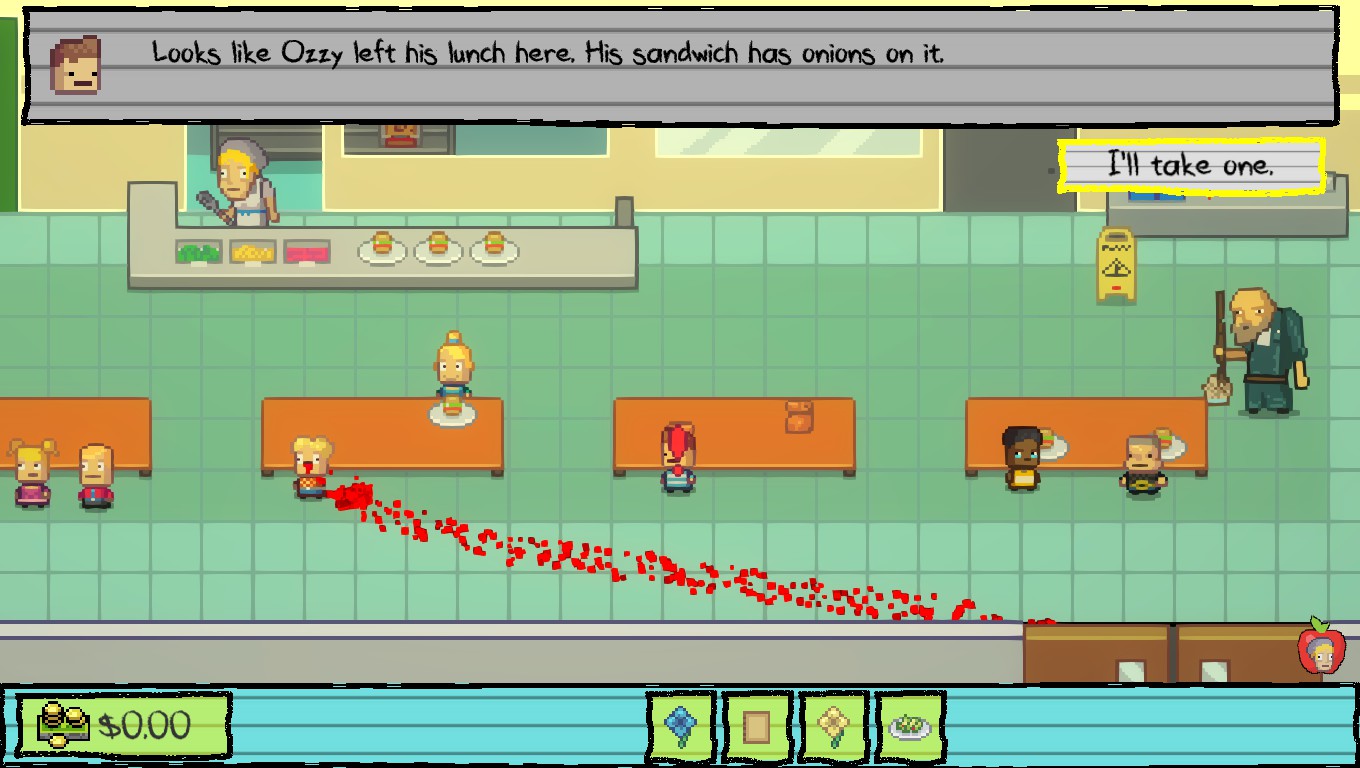
- During lunch, Ozzy will leave to use the bathroom, leaving his bag lunch unattended. Interact with it to get the [ONION] Monstermon card.

(Collectables!)
- As it's easy to reload and restart sections of the day in Kindergarten 2, we can deviate from the story here to grab a Monstermon card. Instead of giving the salad to Felix, skip ahead to lunch. Go down the alley to see Agnes the dumpster hag. Trade her the salad for her cat Gravy. Talk to Cindy, who is jumping on the trampoline. Give her Gravy to get the [HAG'S RAGS] outfit AND the [POT OF GREASE] Monstermon card - then just reload the day from lunch - you'll still be able to keep the card!


-------------------------------------------------------------

Recess

- Talk to Felix, who will give you some contraband to plant by the tree with the beehive. Do so, then call Penny over. Shake the tree and she'll be stung by the bees. Cindy will then give you the flower.

- Next, Bob will appear and give Ms. Applegate a bouquet of flowers, which will be conveniently left behind for you to grab a flower from!


(Achievement!)
- Follow Ms. Applegate and Bob to the teachers' lounge to see them making out - and to earn the K-I-S-S-I-N-G Achievement!

(Collectables!)
- Examine the fallen beehive to get the [THE TALLEST TREE] Monstermon card.


(Collectables!)
- Try to sell the "contraband" to Monty. Tell him you think it's worth more and he'll also throw in the [LITERALLY GRASS] Monstermon card.


(Collectables!)
- Climb the rock wall - the grey grips are unstable, so stick to the green and yellow ones. The [CASTLE OF SAND] Monstermon card is at the top.


(Collectables!)
- Talk to Jerome, by the swings. He'll give you a riddle to solve. The correct answer is: YELLOW, BLUE, BLUE, RED, BLUE, RED. Solve it and the [CYCLOPS DUCKLING] Monstermon card will appear.


- Sell the "contraband" to Monty for $5.00 (and an optional Monstermon card) so you'll be able to pay your lab fee.

- Go up the alley at the top of the playground to the dumpster. Pick the green flower that is growing nearby.

- Pay the lab fee and go to afternoon science class.


-------------------------------------------------------------

Science Lab

- As you've managed to collect all 5 flowers, Dr Danner will leave the classroom and return with a carnivorous plant which he's named Diana.

- You're then tasked with solving the puzzle of what order to feed Diana the coloured flowers. Like Dr Danner says though, he got the answer by simply looking around. Look at the coloured fish and flasks in the background. The answer is: BLUE, YELLOW, PURPLE, RED, GREEN.

- You'll now be awarded with the key item [A+ Report Card] and the [MONSTROUS FLYTRAP] Monstermon Card.


-------------------------------------------------------------
x

Kindergarten 2 Guide - "A Tale of Two Janitors" Storyline

This is a little guide for the Steam title Kindergarten 2, the sequel I was desperate for ever since I played the original! Like the original, it's an indie puzzle/logic/interactive story game available on Steam. Many of the puzzles and characters' storylines require strict timing and succession of events - and I recommend you try your hardest to figure out the puzzles on your own before consulting my guide below.

With that being said, if you're pulling your hair out - here's the guide. Obviously, it contains SPOILERS.

(Click on the screenshots to enlarge them!)


-------------------------------------------------------------

(No items are needed from your bedroom before school starts.)

School Yard

- Talk to the Janitor, ask him "You don't know his name yet?"


- Talk to the new janitor Bob, he's wearing grey on the far right. Ask him "What's your name?"

- Talk to the Janitor, tell him "It's Bob." Take his 'declaration of war' and give it to Bob.

- Return to the Janitor and tell him you delivered it.


-------------------------------------------------------------

Morning Time

- Attempt to leave the classroom. Agree to accept study hall as a punishment.

- Enter the boys' bathroom and talk to the Janitor.

- Leave, talk to Stevie, tell him you need to go upstairs. Reply "okay," and return to the Janitor - he will deal with Stevie for you.


(Collectables!)
- Examine Stevie to obtain the [STRICT SASH] outfit.


(Collectables!)
- Enter the girls' bathroom and talk to Bob. When questioned about the 'declaration of war,' tell him that you can't read or write. He will go and speak to the Janitor and think the matter is sorted, rewarding you with the [MR. NICE GUY] Monstermon card. Don't worry, this doesn't affect the story whatsoever and we can continue on.

(Collectables!)
- Also whilst inside the girls' bathroom, inspect the purple sofa. You will find a [CHAIR OF SPIKES] Monstermon card between the cushions.


- Enter the science lab and talk to Monty, ask him "Do you have a key to the elevator?" Get the key, get kicked out of the lab, go back down the stairs and talk to the Janitor. Give him the key.


- Return to your classroom and eat your last apple. Stevie will crawl in and give you a passbook.


-------------------------------------------------------------

Lunch

- The Janitor will call you on your walkie-talkie, telling you to come upstairs.

- Talk to Carla and pay her $5.00 to cause a distraction, allowing you to sneak out. Go upstairs to the girls' bathroom. (Do not approach Monty!)


(Collectables!)
- Examine Bob's corpse to obtain the [JOLLY JUMPER] outfit.


- Talk to the Janitor, say "I'm here, what do you want?" He gives you the key to his 'weapons room,' or the janitor's closet.

- Go downstairs, enter the boys' bathroom and use the key on the door on the far wall.

(Collectables!)
- Examine the yellow bin to obtain the [BUCKET O WATER] Monstermon card.


- Take the chainsaw and return to the Janitor upstairs in the girls' bathroom. He will begin to dismember Bob's corpse. He will give you Bob's head and send you off to study hall.


-------------------------------------------------------------

Study Hall

- Choose the "say nothing" option whilst Dr. Danner is berating you. Use one of your apples and he will leave to use the bathroom.


- The Janitor will call you on his walkie talkie telling you that Penny is onto the two of you. Take the toy car from the toy box on your way out. Place it on the stairs and go to the cafeteria.


- Throw Bob's head away in the garbage can. Penny will enter - tell her that you're looking for the Janitor - she'll run off to find him and fall down the stairs thanks to your cleverly placed booby-trap!

- Return to study hall - make sure you sit at the same desk you were originally sat at! Eat one of your apples.


-------------------------------------------------------------

Gym Class

- The Janitor will call you again on the walkie talkie and ask you to deal with Stevie's body.

- Go over to Jerome and Carla, who are fighting over a basketball. Help Carla to snatch it and Ms. Applegate will get hit - consequently chasing Jerome out of the room and leaving you free to continue on.


- Grab the green glob from the puddle beside the elevator.

- Go to the janitor's closet, pick up the black garbage can that contains Stevie and leave before you're suffocated by the mysterious green smoke...


- Go through the cafeteria by the door on the far left, cross the playground, go up past the wooden fence to the dumpster area.

- Tell the Janitor you brought the bag. Bang on the dumpster and talk to Agnes the dumpster hag. Give her the green glob and she'll let you dispose of things in the dumpster.


For completing "A Tale of Two Janitors" storyline you will receive the [LAMB WITH CLEAVER] Monstermon card and the key item [BOB'S TOOLBELT].


-------------------------------------------------------------

01/07/2019

Viscera Cleanup Detail: Frostbite Paperwork & PID Guide

If you're a completionist (like me) and want to squeeze every single possible % completion out of each level in Viscera Cleanup Detail, you've come to the right blog. Percentage is awarded based on the overall cleanliness of a level, up to the total of 100%. However, there is additional points to be earned by completing the additional objectives, namely the stacking zones and the dreaded PAPERWORK.

Here's a little guide to help you achieve the maximum percentage score on the Frostbite level.


In order to award you the full percentage ALL of the text boxes (EXCEPT the Union Report at the very bottom) must be COMPLETELY filled in. In order to accomplish this, I simply CTRL+V'd in a Notepad document of full stops I prepared earlier. You're welcome to copy this method, mash random keyboard buttons or paste in a block of Lorem Ipsum text - whatever fills the box up completely.


For your employee ID number, mash the number pad with random numbers until that too is filled completely.


The tick boxes regarding your personal opinions can be ticked with whatever you please, as long as SOMETHING is ticked.


The following boxes in the Incident Particulars section must be ticked:

ALIENS, CORRUPTION, ENIGMATIC FORCES, FIRE, MUTATIONS

In the text boxes, fill out the following:

Number of Dead Aliens: 0
Number of Shell Casings: 0
Number of Bullet Holes: 0

To find the number of incinerated items (as this number will differ from player to player) follow this file path:

Local disk > Program files (x86) > Steam > SteamApps > Common > Viscera > Saves

Find the save file of the level you are currently playing and open it with Notepad. CTRL+F "NumIncineratedItems" and you will find the number to enter in the "Number of Items Incinerated" column.


There are a total of 12 dead employees found on this level whose PIDs must be collected and scanned at the Punch-O-Matic machine.

I recommend as you clean the level and dispose of body parts and viscera to leave the PIDs exactly where you find them and collect them at the end of the level before filling out the WTF forms and their cause of death - if you move them around, they may become mixed up. Also please note, I do not refer to the employees by name, as in this level, the names are randomised and will differ from player to player.

This employee is on the ground close to the starting area. They show signs of being CRUSHED, IMPACT and SLAIN.


This employee is hidden behind the shipping containers close to the starting area. They show signs of being SLAIN.


This employee is leaning against a large red shipping container opposite the entrance to the underground office. They show signs of IMPACT, SLAIN and THROWN.


This employee is on the stairs leading to the underground office. They show signs of being SLAIN.


This employee is hanging from the ceiling in the underground office area. They show signs of being DECAPITATED, DISMEMBERED, EVISCERATED, HALVED, IMPALED, SLAIN and STABBED.


NOTE: There are 3 bodies heaped together in the central area outside. It can be hard to differentiate them - however, all 3 of them have the same causes of death, except one of them was NOT halved. You may have to save, exit the level and retry several times until your paperwork is perfect.


This employee is outside in a pile of bodies. They show signs of being BURNED, DECAPITATED, DISMEMBERED, EVISCERATED, HALVED, SLAIN and STRICKEN. 


This employee is outside in a pile of bodies. They show signs of being BURNED, DECAPITATED, DISMEMBERED, EVISCERATED, SLAIN and STRICKEN. 


This employee is outside in a pile of bodies. They show signs of being BURNED, DECAPITATED, DISMEMBERED, EVISCERATED, HALVED, SLAIN and STRICKEN.


This employee is the first corpse you find in the tunnel leading to the underground ice area. They shown signs of being SLAIN and SLICED.


This employee is the second corpse you find in the tunnel leading to the underground ice area. They show signs of being DISMEMBERED, EVISCERATED, HALVED, SLAIN and THROWN.


This employee is in the underground ice area. They show signs of being IMPACT, SLAIN and THROWN.


This employee is outside on top of a yellow shopping container. You will need the J-HARM to reach them. They show signs of being DECAPITATED, DISMEMBERED, EVISCERATED, HALVED and SLAIN.